Devcontainer with Visual Studio Code
For running applications, especially in the cloud environment, the use of containers has become established. With the advent of Docker, it became easy to execute software in a defined environment that can be easily reproduced. All runtime dependencies are packaged into a container image and can be run on a different system effortlessly. The disparity between different stages in the development process (Development, Testing, Production) is reduced, and “works on my machine” is no longer a valid excuse.
To make not only the runtime but also the development environment reproducible and portable, Development Containers are a suitable solution.
Development Container
Creating a development environment nowadays often requires more than just a text editor or an IDE. Runtimes, compilers, CLIs, and various tools are needed to develop software. If you work with multiple programming languages or projects, the setup process can quickly consume several hours. Another issue arises when different versions of software are needed. Node.js, for instance, is an example for which the Node Version Switcher provides more of a workaround than a good solution.
To address these problems, pre-configured virtual machines have been used for a long time, either executed locally or accessed remotely through protocols like SSH or RDP. However, the developer experience is often suboptimal in both cases.
When using Visual Studio Code for development, utilizing Devcontainers offers a lightweight alternative. Currently, besides VS Code, only Visual Studio supports the use of Devcontainers, and only for C++ projects. If your workflow can accommodate these limitations, Devcontainers are a great option. An additional advantage is that Devcontainers behave consistently across different computers and operating systems, making them suitable for team collaboration. Configuration can be stored alongside the source code in a Git repository and versioned.
Devcontainers in VS Code
The prerequisites for using Devcontainers in VS Code include having an installed version of Docker and the Dev Containers extension, which is provided directly by Microsoft. Through the Command Palette, this extension offers a set of commands to create and manage Devcontainers.

Creating a Devcontainer
To create a Devcontainer, a JSON file named devcontainer.json in the .devcontainer subfolder is all you need. The definition of a container essentially consists of three sections: Image, Features, and Configuration. When you choose the Dev Containers: Add Dev Container Configuration Files... command in VS Code, you will be guided through these three sections.
-
Image: Describes the Docker image that serves as the base for the Devcontainer. You can use a pre-configured Devcontainer image or any other Docker image. Alternatively, you can specify a Dockerfile or a Docker Compose file to create your own image.
-
Features: Packages and options to add and configure software to the base image. This can include tools like Git, various CLIs, Docker, or even entire development stacks for programming languages such as Go, .NET, or PHP as features. There are some predefined features, or you can create custom features using shell scripts.
-
Configuration: Configuration includes aspects like port forwarding, lifecycle scripts, or adjustments for VS Code.
The following configuration uses the Node.js 20 base image with TypeScript, additionally installs the AWS and GitHub CLI, and runs the yarn install command after creating the container:
{
  "$schema": "https://raw.githubusercontent.com/devcontainers/spec/main/schemas/devContainer.schema.json",
  "name": "Node.js & TypeScript",
  "image": "mcr.microsoft.com/devcontainers/typescript-node:0-20",
  "features": {
    "ghcr.io/devcontainers/features/aws-cli:1": {
      "version": "latest"
    },
    "ghcr.io/devcontainers/features/github-cli:1": {
      "installDirectlyFromGitHubRelease": true,
      "version": "latest"
    }
  },
  // Use 'postCreateCommand' to run commands after the container is created.
  "postCreateCommand": "yarn install"
}
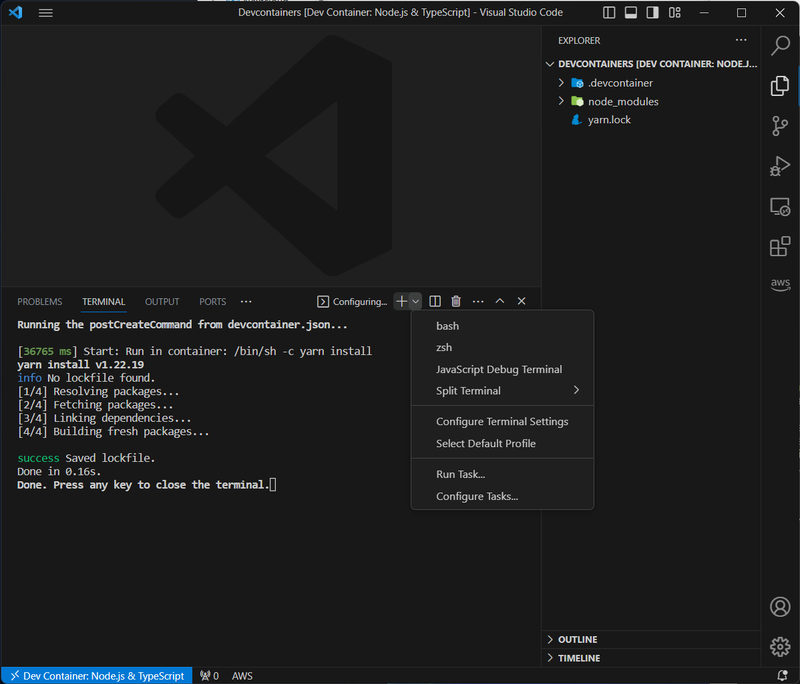
When you use the VS Code Command Palette to execute the Dev Containers: Reopen in Container command, the Devcontainer is created, and VS Code establishes a connection to the container. The creation process may take a few minutes as it involves downloading the base image and installing the specified features. The root folder of your project is mounted inside the container.
Once the container is up and running, VS Code displays the mounted folder in the Explorer, allowing you to start your development work. You can access a shell running inside the container by clicking the + icon in the Terminal window. This provides a seamless environment for development within the Devcontainer.

Creating a Custom Devcontainer Image
If a preconfigured image combined with the available features doesn’t meet your requirements, you can create a custom Devcontainer image using a Dockerfile.
For a basic Ruby setup, your Dockerfile might look like this:
FROM ruby:3.0-bullseye

RUN apt-get update && export DEBIAN_FRONTEND=noninteractive \
  && apt-get -y install --no-install-recommends nano libvips libvips-dev libvips-tools

RUN gem install jekyll bundler
Inside the devcontainer.json file, instead of using the image keyword, you provide the Dockerfile path and the build context under the build section. The Features block is used to install ZSH as the default shell and git. Additionally, VS Code is instructed to install the Ruby and Github Copilot extensions. Using the postCreateCommand entry ensures that the required gems are installed.
{
  "$schema": "https://raw.githubusercontent.com/devcontainers/spec/main/schemas/devContainer.schema.json",
  "name": "Ruby DevContainer",
  "build": {
    "dockerfile": "Dockerfile",
    "context": "."
  },
  "features": {
    "ghcr.io/devcontainers/features/common-utils:2": {
      "installZsh": true,
      "configureZshAsDefaultShell": true,
      "installOhMyZsh": true,
      "username": "vscode",
      "userUid": "1000",
      "userGid": "1000",
      "upgradePackages": true,
      "nonFreePackages": true
    },
    "ghcr.io/devcontainers/features/git:1": {
      "version": "latest",
      "ppa": false
    }
  },
  "customizations": {
    "vscode": {
      "extensions": [
        "rebornix.Ruby",
        "GitHub.copilot"
      ]
    }
  },
  "forwardPorts": [],
  "postCreateCommand": "bundler install --gemfile=./Gemfile && ruby --version",
  "remoteUser": "vscode"
}
If you want to install additional software or have made changes to the container image, you can simply create a new image using the command Dev Containers: Rebuild and Reopen in Container.